I'm not even sure what "Sabretooth Magic" means.
Just saw it written on a van the other day and it sounded really cool.
Don't even care what it means, it sounds so cool.
OK, so you guys asked about pics of a frame-start to finish, so here's the photo dump for y'all.
Top tube. Radiused and mitered.
Down tube. Gusseted and mitered.
Head tube. Turned on the lathe. Relieving the center of the tube to shave some weight, while leaving the ends thick to fight distortion and ovalizing.
Bottom bracket shell. Pf30. Seat tube and down tube mitered and fit up, ready for tacking.
Head tube. Made for the 44mm headset to accept a tapered steerer tube.
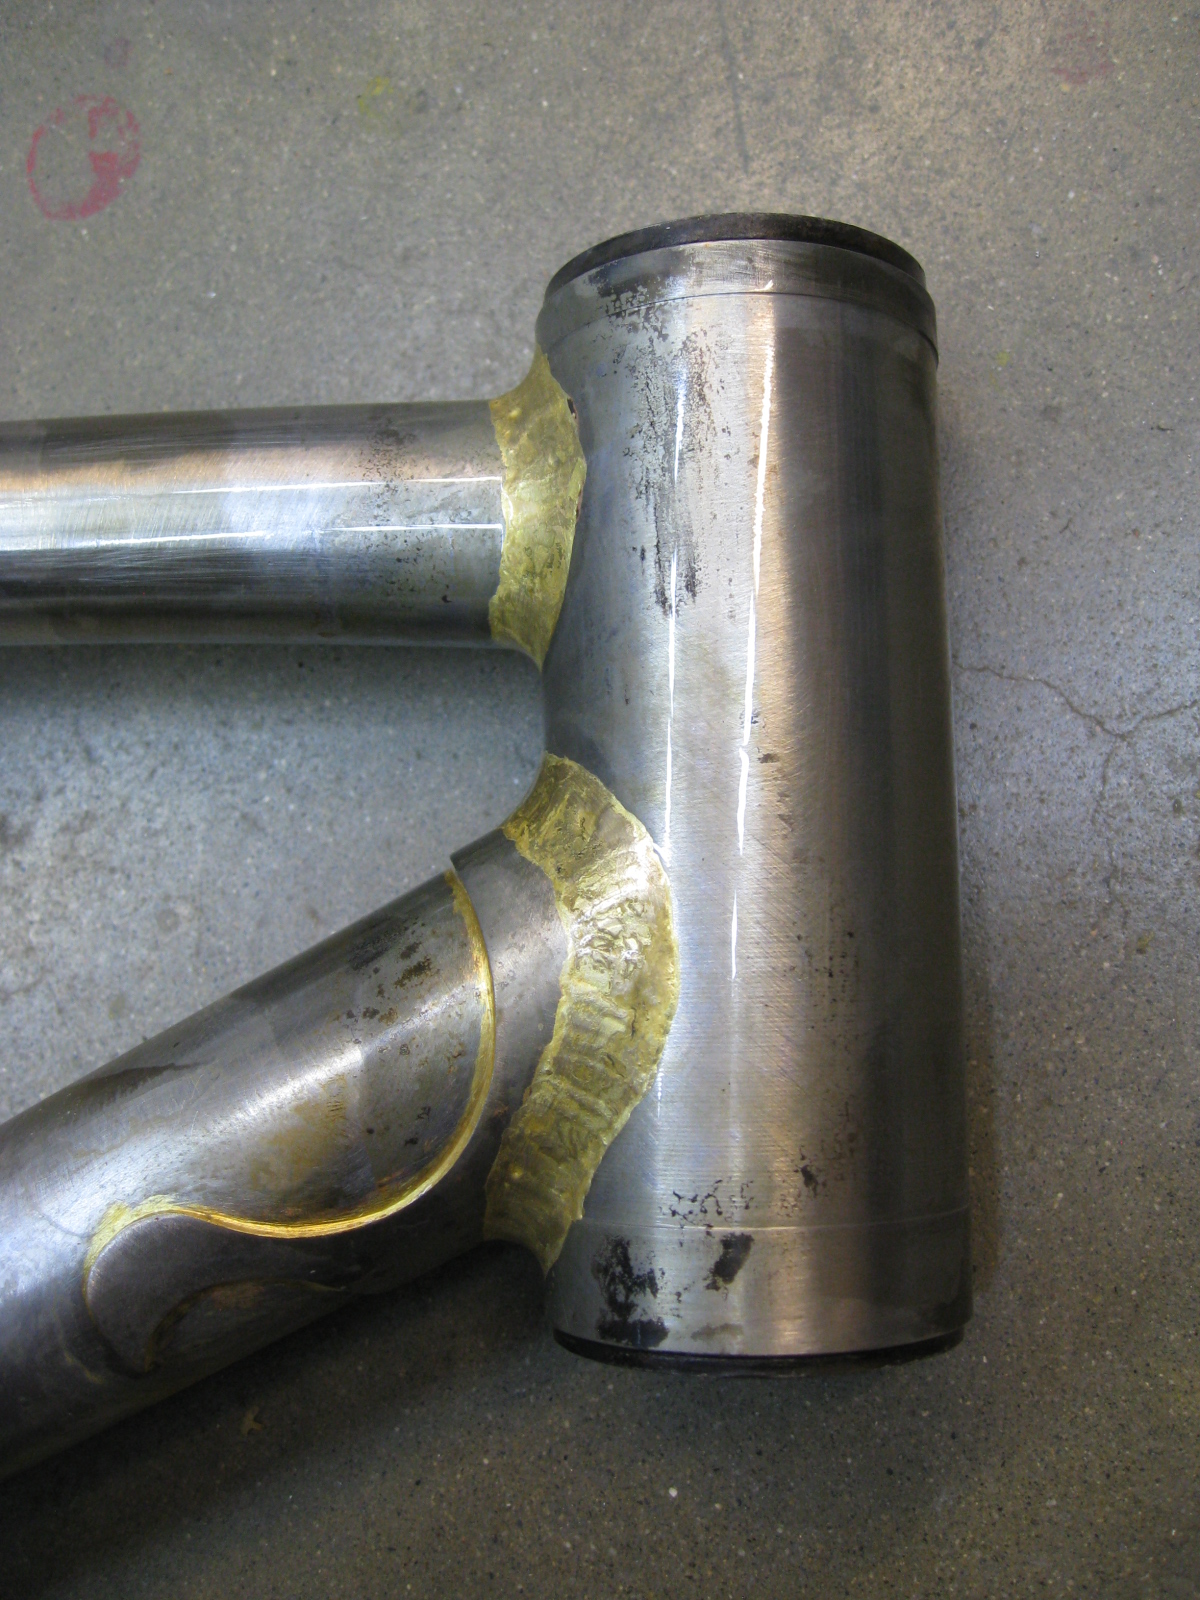
top and down tubes mitered and fit up.
Seat tube and top tube. Miters must be tight to keep the joints from moving around when brazing.
Seat tube at the bb shell- tacked.
Seat tube at the bb shell- brazed.
These two pics are measuring the symmetry of the seat tube. A straight bike starts with a straight seat tube. Everything is measured relative to the bb shell. Either parallel or perpendicular.
After the seat tube is brazed and cleaned, the other tubes of the front triangle are tacked in place onto the seat tube/bb shell sub-assembly.
Once tacked, the front triangle is checked against the full size drawing of the frame. If I've done my job, it all lines up perfectly.
The chainstays are then added to the front triangle and held up to the drawing to make sure they are perfect as well.
Jump ahead a bit, and the bb shell has been brazed and the flux has been soaked off. At this point nothing else will be done to this area, other than a bit of finish work, so I ream and face the bb shell.
Here's the shell, post ream and facing. When brazing or welding, the heat distorts the shell. Remember the part about how everything is built and aligned relative to the shell? I like to have a straight and flat bb shell as early on in the process to check everything against as I go. It might not be the fastest way to do it, but it insures the frame will be dead straight every time.
The "Y" shaped tool is something I made to help locate the center line of the frame. The seat tube at the bottom bracket shell is the best place to locate the center line. No matter what you do, the center of that tube at the shell is going nowhere. It can't go up or down. A good place to determine the absolute center line of the completed frame.
Here's the same tool, at the same height, at the top of the seat tube. Dead on.
Here's the same tool, at the same height, at the head tube. Dead on.
This tool is a height measuring tool. The little ball ended wand pivots and measures height in thousandths-of-an-inch increments. This is used for measuring the head tube's flatness relative to the seat tube by checking the height at both ends of the tube. This insures that the front wheel is under the rider and steering straight ahead.
After all the alignment is checked out, the head tube junctions and the top tube at the seat tube are brazed. This pic is after the flux has been soaked off.
Here's the head tube after the finish work. Smooth and shiny.
After the alignment has been rechecked, the seat stays are bent, mitered, and ready to get tacked on.
Adding the seat stays to the mix locks a lot of things down. It's very important to get it right. This fixture holds the rear axle perpendicular to the seat tube while holding the seat stays in their proper place.
Here's that center line tool again making sure the rear wheel is in the same plane as the frame.
The wheel itself has a cool history. It's a custom Phil Wood hub made at 135mm, with a qr axle, for Bontrager as a check wheel when they were still making frames. The hub has super tall and wide flanges, and build with radial spokes for a wheel that's as stiff as possible. The wheel can't really be ridden, but has been integral in building thousands of frames.

Center line tool at the bottom of the wheel. Dead on
Center line tool at the top of the wheel. Dead on.
When the tacked seat stays check out as being on the money, they are brazed on. This pic is after the finish work has been done.
Alignment is re-checked. The seat stay bridge is hand mitered to fit.
The chain stay bridge is hand mitered to fit.
This fixture holds the bridge straight while being tacked in place.
This tool will hold all kinds of bridges and braze-ons.
After tacking, the fixture is removed, the bridge checked for straightness, and brazed in place.
Here's the bridges brazed and finished.
The braze-ons are brazed on.
After all the braze-ons and final alignment checks, the head tube and seat tubes are reamed and prepped.
If I've done my job, not much metal comes out with the reamer.
At this point, the frame is ready for powder/paint.
Done been painted!
Done been componented!
Thanks for checking it out.
Sorry if it got boring.
Two words: