Tuesday, October 2, 2012

Sabretooth Magic


I'm not even sure what "Sabretooth Magic" means.
Just saw it written on a van the other day and it sounded really cool.
Don't even care what it means, it sounds so cool.

OK, so you guys asked about pics of a frame-start to finish, so here's the photo dump for y'all.
Top tube. Radiused and mitered. 
 Down tube. Gusseted and mitered.
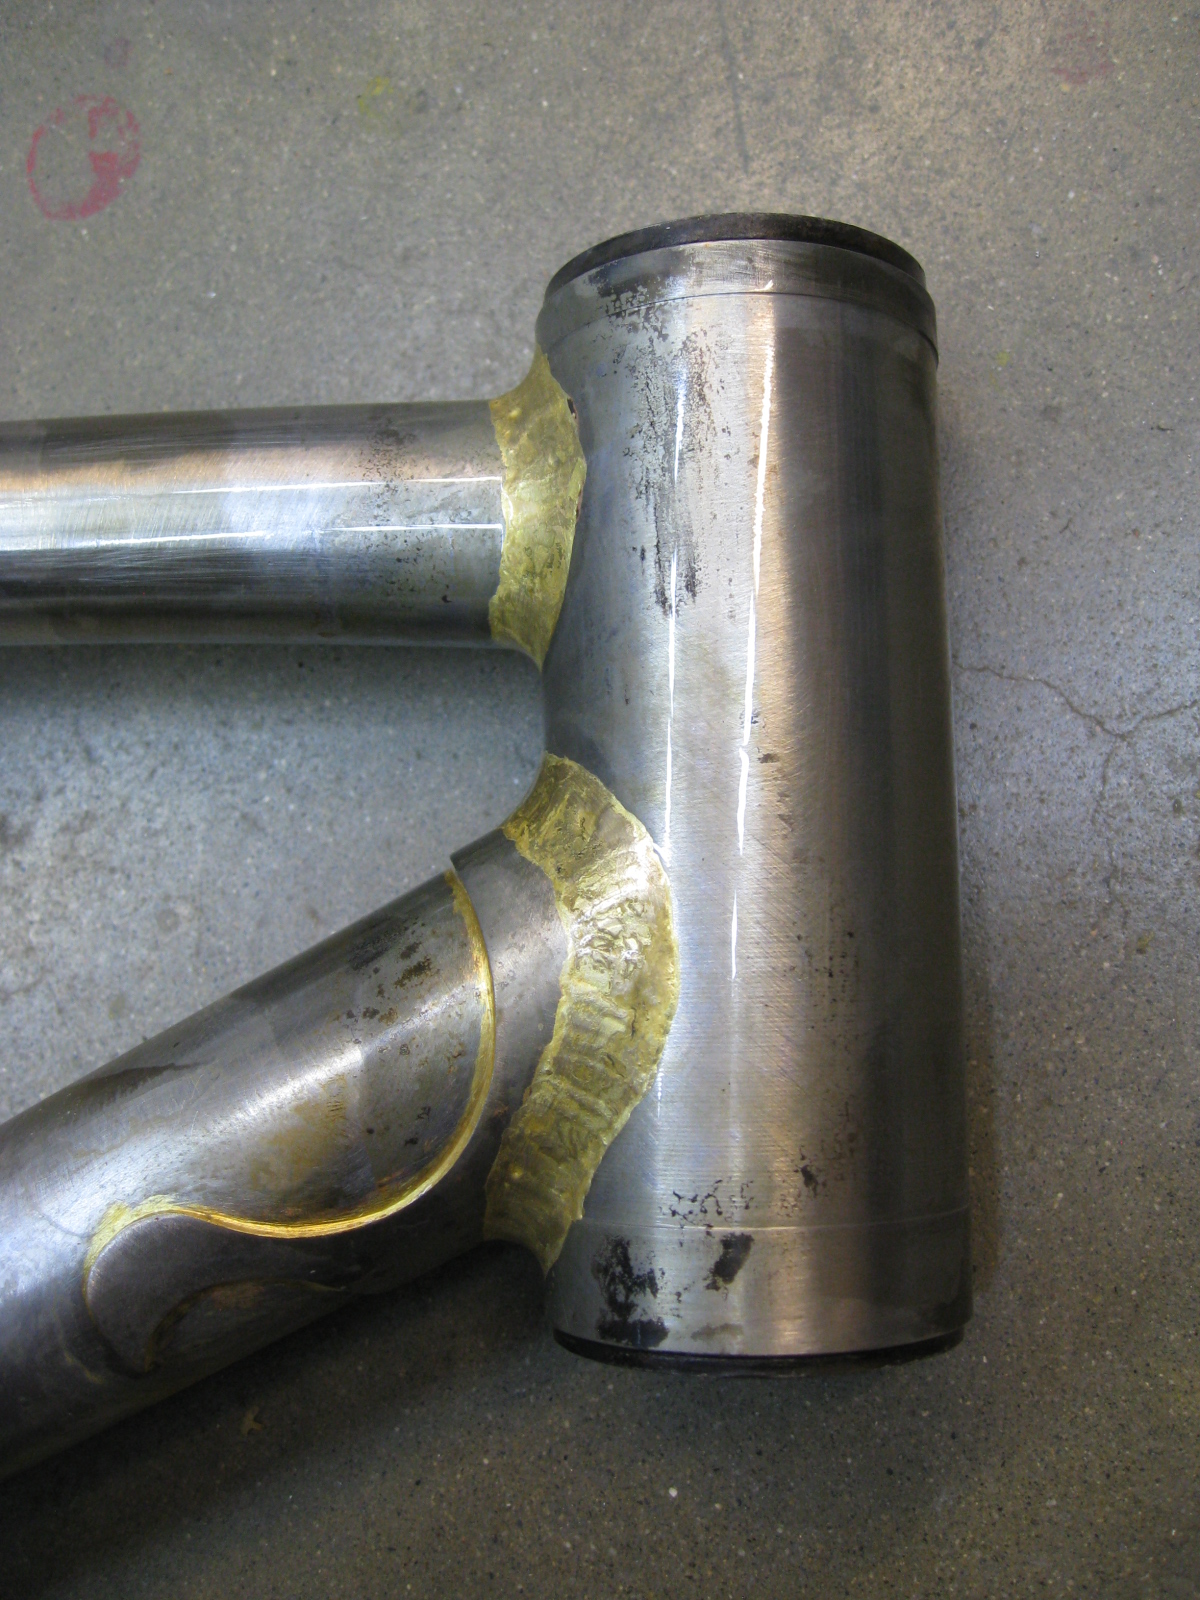
Head tube. Turned on the lathe. Relieving the center of the tube to shave some weight, while leaving the ends thick to fight distortion and ovalizing.
Bottom bracket shell. Pf30. Seat tube and down tube mitered and fit up, ready for tacking. 
 Head tube. Made for the 44mm headset to accept a tapered steerer tube.
top and down tubes mitered and fit up.
 Seat tube and top tube. Miters must be tight to keep the joints from moving around when brazing.
Seat tube at the bb shell- tacked.
Seat tube at the bb shell- brazed.
These two pics are measuring the symmetry of the seat tube. A straight bike starts with a straight seat tube. Everything is measured relative to the bb shell. Either parallel or perpendicular.

 After the seat tube is brazed and cleaned, the other tubes of the front triangle are tacked in place onto the seat tube/bb shell sub-assembly.
 Once tacked, the front triangle is checked against the full size drawing of the frame. If I've done my job, it all lines up perfectly.
The chainstays are then added to the front triangle and held up to the drawing to make sure they are perfect as well.
 Jump ahead a bit, and the bb shell has been brazed and the flux has been soaked off. At this point nothing else will be done to this area, other than a bit of finish work, so I ream and face the bb shell.

 Here's the shell, post ream and facing. When brazing or welding, the heat distorts the shell. Remember the part about how everything is built and aligned relative to the shell? I like to have a straight and flat bb shell as early on in the process to check everything against as I go. It might not be the fastest way to do it, but it insures the frame will be dead straight every time.
 The "Y" shaped tool is something I made to help locate the center line of the frame. The seat tube at the bottom bracket shell is the best place to locate the center line. No matter what you do, the center of that tube at the shell is going nowhere. It can't go up or down. A good place to determine the absolute center line of the completed frame.
 Here's the same tool, at the same height, at the top of the seat tube. Dead on.
 Here's the same tool, at the same height, at the head tube. Dead on.
 This tool is a height measuring tool. The little ball ended wand pivots and measures height in thousandths-of-an-inch increments. This is used for measuring the head tube's flatness relative to the seat tube by checking the height at both ends of the tube. This insures that the front wheel is under the rider and steering straight ahead.  
 After all the alignment is checked out, the head tube junctions and the top tube at the seat tube are brazed. This pic is after the flux has been soaked off.
Here's the head tube after the finish work. Smooth and shiny. 
 After the alignment has been rechecked, the seat stays are bent, mitered, and ready to get tacked on.
Adding the seat stays to the mix locks a lot of things down. It's very important to get it right. This fixture holds the rear axle perpendicular to the seat tube while holding the seat stays in their proper place. 
Here's that center line tool again making sure the rear wheel is in the same plane as the frame.
The wheel itself has a cool history. It's a custom Phil Wood hub made at 135mm, with a qr axle, for Bontrager as a check wheel when they were still making frames. The hub has super tall and wide flanges, and build with radial spokes for a wheel that's as stiff as possible. The wheel can't really be ridden, but has been integral in building thousands of frames.  


Center line tool at the bottom of the wheel. Dead on

Center line tool at the top of the wheel. Dead on.
 When the tacked seat stays check out as being on the money, they are brazed on. This pic is after the finish work has been done.
Alignment is re-checked. The seat stay bridge is hand mitered to fit.
 The chain stay bridge is hand mitered to fit.
 This fixture holds the bridge straight while being tacked in place.
This tool will hold all kinds of bridges and braze-ons.
 After tacking, the fixture is removed, the bridge checked for straightness, and brazed in place.
 Here's the bridges brazed and finished.
 The braze-ons are brazed on.
 After all the braze-ons and final alignment checks, the head tube and seat tubes are reamed and prepped.
If I've done my job, not much metal comes out with the reamer.
At this point, the frame is ready for powder/paint. 

Done been painted!


Done been componented!


Thanks for checking it out.
Sorry if it got boring.


Two words:


Friday, August 10, 2012

Max Mix

 Hey, Gang.


The bike du jour is for Tim Killen up in the Big Sky State, specifically, Whitefish.
 Tim wanted a road bike that was stiff enough for racing 
but wasn't afraid to tackle the dirt roads 
so frequently connecting the places he likes to go in Montana.


 We ended up agreeing upon a mix of Columbus Max tubing 
for the stiffness and the cool profiles on the front end, and a mix of 
Columbus Zona and True Temper Platinum for the rear end.


Subtle logos, bright colors.


The joining of the traditional front derailleur tab
with the new school bottom bracket shell design.


Enve carbon fork keeping the front wheel attached.
When the fit is all figured, we'll be doing a stem to match the colors of the fork.

Replaceable hangered dropouts.

Thanks, Tim.


I was just recently in the State of Alaska riding bikes.
One of the dangers of mountain biking in Alaska is
 coming up quickly on a suddenly frightened bear.
 One of the ways to avoid this conflict is to make as
 much a racket as possible to notify the bear you're
 coming so he or she can split. My crowd decided
 on singing all the pop hits of the seventies and eighties
 we could think of. It worked. No grizzly sightings.
I guess the bears are as into Chicago as much as I am.


*Celebrity guest photographer Brian Vernor.
Thanks, Brian.

Wednesday, June 20, 2012

Messin' with Texas


Hey, Y'all.
This frameset is for Davis Bickston from the Republic of Texas.


Davis wanted a single speed 29er, and that's just what he got. 


This little bridge between the top and seat tubes allows for a bit more 
stand over clearance while keeping the arced line.


Pewter anodized dropouts.


A mix of careful masking and brush painting.


Segmented forks allow the builder to tune the ride of the fork
for each individual. I like to fillet braze the crown first with brass, 
leaving the steerer tube and fork blades to be brazed in 
with silver, which has a much lower melting temperature,
 to keep the steerer and blades much less heat effected
and as strong as possible.  


Thanks, Davis.


Here's a little clip from Texas.
It's the Lillingtons. Man, they were young!
Death By Television has to be one of the 
most ridiculously fun records since The Ramones.
Viva, los powerchords!

Thursday, May 24, 2012

Pack Mule


Hey gang.
This post is slightly different than the norm.
I'm going to show you the bike while in action.

This bike was built for NAHBS as a bike packing bike.
Full Moto-Touring.


 I guess it makes sense to show it off to you half way through a short 
excursion in the local 87,000 acre state park.
  

The bike was built as a fairly straight forward mountain bike.
Not super light, not super beefy. 


I've seen rack mounts torn off seat stays, or worse, 
cracked or torn the seat stay itself.
These mounts run through both sides of the tube
and are threaded all the way through.
Keeps the frame strong, the rack stiff, 
and the mounting bolts much less likely to back out.


The loops on the racks are for running straps through to 
stop them from migrating around and loosening.
I prefer to make touring gear to be as universal as possible. 
With these racks you can strap anything on them and off you go. 
I like running dry bags. Easy, light, and replaceable in a pinch.

These are third set of racks I've made myself
to make sure all the bugs were worked out.
Those bugs are now long gone.

Racks allow for things to be tight, immovable, and out of the way.
I like my skills dictating whether or not I feel comfortable 
going for that steep off-camber switchback, 
not my gear getting in the way or pulling me around.


The front rack is mounted both from underneath, with an 
expanding wedge that holds tight in the steerer tube, 
and from above between the headset and stem.
With all the moving parts, there's not a lot of room to spare so the bolt head
 on the wedge must be a button head, and the brace from below must
 do a little up and over to make room for the bridge on the fork lowers. 
It's tight, but there's just enough room.


 Add some extra pounds on the front end of a bike 
and wider handle bars make a lot of sense.
Add a few inches of width to your handle bars and 
suddenly that stem is a bit overwhelmed.
Adding a bit of width to the stem suddenly 
brings it all back to the comfort zone.
It looks pretty cool too. 


Proto-typical proprietary dropout.
Holes drilled for 5mm, 6mm, or 8mm bolts.
You thought the holes just looked cool? 

Full length housing routed on the top of the down tube, 
the side of the tube least likely
 to get yanked when barging an overgrown trail, 
damaged from portaging or kicked up debris.
 Protects the frame when using front triangle frame bags,
and keeps those bags tight, 
since you're not fighting the cables to strap them on. 


This bike is going to be a work in progress.
At the show, I wanted to have another fork and 
set of racks for more road going voyages but ran out of time.
I'll keep y'all posted as it occurs. 


Sorry it's been so long posting, but the timing of frames going out has been awkward  
and I've gotten a bit bored of my own web-log. 
If I'm bored, you've got to be in tears by now. I've
been thinking that the "end result format" is getting a bit stale.
I'm not going to start covering religion and politics, 
and I'm not going to wax poetic on the virtues of my chosen
brand of flux, tubing, safety glasses, peanut butter, etc, 
but if you were coming to visit the shop, 
what would you want to see?
See. Not read. See.
Think photo essay, not a regrettable ranting diatribe.


You will not be let off the hook when it 
comes to my horrific taste in music though.
It is a one man dance party, after all...
Lately I've been obsessed with
Future of the Left


Or you can watch a whole set starting here.